Pages

Thursday 25 April 2013

Chocolate Mayonnaise Cake with Coconut

It was my birthday a couple of weeks ago. I turned the ripe old age of 26, obviously cake was going to be a big part of my birthday. I was starting to get excited because I could pick a recipe and it didn't really have to please anyone else, after all, it was my day! I was then told it would be "sad" if I made my own cake, so the condition was that I was not allowed to bake but I was allowed to decorate! I settled on the Donna Hay Melt and Mix Chocolate Coconut cake. Coconut is one taste I've acquired as an adult and I think it is perfect in cake. However when I thought back to the Donna Hay cake, there was nothing technically wrong with the recipe, in fact I love the flavour, but I really did want a super moist cake, and that one is just a tad dry for my liking. I'd long heard the urban cake myth about using mayonnaise in a cake to make it extra moist and when you think about the main ingredients (oil & eggs) , it really does make sense, so I thought if I could find a good choc-mayo recipe (thank you Serious Eats) and then add some coconut, I'd have my Donna Hay favourite with extra moisture... So here it is, it was perfectly moist, perfectly cocnutty and perfectly fun for a birthday. I was channeling my inner cake inspiration with the decoration on this one, Sweetapolita as I droooled every time I saw this post!


Chocolate Mayonnaise Cake with Coconut

  • 3 large eggs
  • 1 1/2 cup + 1 tablespoon sugar
  • 1 tablespoon vanilla extract
  • 1 1/4 cups mayonnaise
  • 2 1/4 cups all-purpose flour
  • 1/4 teaspoon baking powder
  • 1 3/4 teaspoons baking soda
  • 3/4 cups + 1 tablespoon dutch-process cocoa powder
  • 1/2 teaspoon salt, generous
  • 1 1/3 cups hot water
  • 1 cup shredded coconut
Chocolate "Galaxy" Frosting (enough to fill generously between layers and frost outside)
  • 440 grams salted butter (room temperature)
  • 380 grams (sifted) icing sugar
  • 2 teaspoons vanilla extract
  • 250grams of your favourite plain chocolate ( I used Galaxy/Dove)
  • 1 tablespoon of Nutella
  • 1 tablespoon of milk

Cake Method

  • 1. Preheat your oven to 180°C. Grease and line two or more 9" cake tins (I used 3).
  • 2. Using an electric mixer, beat the eggs and sugar in a large bowl on medium-high speed until thick and very light in color; about 6 to 8 minutes. 
  • 3. Add the mayonnaise and vanilla extract, and beat on medium speed until combined.
  • 4. Add the flour, baking powder, baking soda, cocoa powder and salt, and beat on low speed until combined. The mixture will look thick and fudgy. 
  • 5. Add the water and mix on low speed until it's incorporated. The batter will be much thinner. 
  • 6. Pour the batter into the prepared pan(s) and bake for about 30 minutes (check it at about 25 minutes), or until a toothpick inserted in the middle comes out clean.Allow the cakes to cool on a rack, in their pans, for 10 to 15 minutes or until they are cool enough to handle. Invert them onto the rack and allow to finish cooling to room temperature.
Frosting Method
  • 1. Combine icing sugar and butter in an electric mixer for about 3 minutes or until combined.
  • 2. Add vanilla, melted chocolate, Nutella, and milk and mix until combined (approx 3-5 mins)


Tuesday 16 April 2013

Best Ever Scones

I love scones. I love the simplicity. I love a good Devonshire Tea and what I really LOVE is a good scone recipe. We all have our favourite scone recipes, maybe even ones that have been passed down from generation to generation, well not mine. Mine is actually from Super Food Ideas and ever since I found this gem, I've been making them ever since. The beauty of them is, that there are only four ingredients... just four. They are quick, easy and tasty and this recipe is a great classic to have in the recipe book.


Ingredients 

3 cups self-raising flour
pinch of salt
1 cup of double cream
1 cup of lemonade or sprite for you Americans

Method

Yield- 24 small or 12 large scones

1. Preheat oven to 220°C. Sift flour and salt into a large bowl and make a well in the center. Pour in cream and lemonade.


2. Mix with a knife or with an electric mixer with the dough hook until mixture has come together.


3. Turn on to a lightly floured surface and kneed until smooth, being careful not to over-kneed.


4. Cut with a scone cutter or even cut with a knife in squares, whatever takes your fancy. I normally keep my dough at about an inch thick, because I like big scones, but this is completely up to you. 


5. Bake for around 10-15 minutes or until golden, again this will vary on the size of your scones. Best served with jam and freshly whipped cream!


Happy Baking xxx


Friday 12 April 2013

Nigella Lawson's Coca Cola Ham

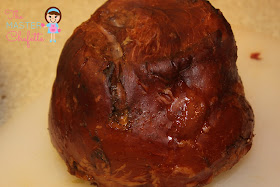
So you probably read the title and thought "Ham? But it's April. Ham is a Christmas thing." Well, yes traditionally ham does come out at Christmas time, but why should it just come out during the festive season. Growing up in an Italian family, ham is not something we ever had at Christmas, it's just not our thing, our thing is lasagne and lamb and loads of other Italian goodies, so we never fully embraced the ham, and what a shame. This past Christmas I was in charge of making the ham, I had never made one before and I wasn't even sure I'd even sure I'd eat it, but I did and I loved it! I went to the trusty Nigella Lawson website and followed her Ham in Coca-Cola recipe, step-by-step and it turned out perfectly, so much so that I even made it this past weekend as a bit of a care package for someone. Considering how much meat is actually in a ham, it was actually really cost-effective and using this recipe made it oh so tasty, don't diss the coke until you've tried it!


(Adapted from the Nigella Lawson recipe featured here. Recipe credits from nigella.com)

  • For the ham
  • kilograms mild-cure gammon or ham
  • onion (peeled and cut in half)
  • litres coca-cola

For the glaze 

  • handful of cloves (I left them out)
  • heaped tablespoon black treacle
  • teaspoons english mustard powder
  • tablespoons demerara sugar or raw sugar 

1. Put the gammon in a pan, skin-side down if it fits like that, add the onion, then pour over he coke. Bring to the boil, reduce to a good simmer, put the lid on, though not tightly, and cook for just under 2½ hours. (If your ham is larger or smaller, work out timing by reckoning on an hour per kilo, remembering that it's going to get a quick blast in the oven later. but do take into account that if the gammon's been in the fridge right up to the moment you cook it, you will have to give it a good 15 minutes or so extra so that the interior is properly cooked.)


2. Preheat the oven to 240°c/gas mark 9. When the ham's had the appropriate amount of cooking time, take it out of the pan and let cool a little for ease of handling. 


3. Remove the skin, leaving a thin layer of fat. Score the fat with a sharp knife to make fairly large diamond shapes, and stud each diamond with a clove. Then carefully spread the treacle over the bark-budded skin, taking care not to dislodge the cloves. gently pat the mustard and sugar onto the sticky fat. 


4. Cook in a foil-lined roasting tin for approximately 10 minutes or until the glaze is burnished and bubbly.


              Thursday 4 April 2013

              Classic Red Velvet Cake with Marscapone & Cream Cheese Frosting

              Red Velvet Cake is one of those deliciously rich and luscious "special cakes" that people will seldom attempt at home. The Red Velvet cake is thought to have originated at the famous Waldorf Astoria Hotel in New York where it was coined "Waldorf Astoria Cake" funnily enough, but many consider the cake to be a treat from the south. I hadn't made this cake in ages, but recently made it over the Easter weekend for some friends. The Cake was tasted by my friend Whitney who is actually from the south, who gave it the big southern thumbs up of approval. Check out Whit's foodie blog over at Whit's Critiques. Red Velvet is not a cake you should be scared of making at home, it is super easy and super tasty, especially with that delectable Marscapone and Cream Cheese frosting. This cake has more of a rustic look to it since the frosting is much lighter than a regular buttercream, but oh so delicious!


              Red Velvet Cake


              2 ½ cups self raising flour
              2 ½ tablespoons cocoa powder
              1 teaspoon salt
              1 ½ cups caster sugar
              2 eggs
              120 grams salted butter
              1½  teaspoons vanilla extract
              1 cup buttermilk
              1 teaspoon white vinegar
              1 teaspoon bi-carb soda
              2 tablespoons (or more) of pillar box red food colouring

              Frosting:

              250 grams cream cheese (room temperature)
              230  grams mascarpone cheese (room temperature)
              1 ½ cups double cream
              1 cup icing sugar
              1 teaspoon vanilla extract

              1. Preheat oven to 175° Celsius.
              2. Line two 9 inch cake tins with baking paper and spray lightly.
              3. Sift the flour, salt, and cocoa powder into a bowl and set aside.

              4. In an electric mixer cream the butter and sugar.

              5. Add the eggs one by one whilst the mixer is still on.
              6. Add the vanilla extract and beat until combined making sure to scrape down the sides of the bowl.
              7. In a measuring jug whisk buttermilk and food colouring until combined.


              8. With the mixer on low speed, alternately add the dry mixture and wet buttermilk mixture to the electric mixing bowl, a small amount at a time until combined. Once combined turn off the electric mixer.


              9. Combine the vinegar and bi-carb soda in a cup, once combined and fizzy, fold into the cake mixture with a spatula.

              10. Divide cake batter evenly between the two or more cake tins and smooth the tops with a spatula (I used three tins)

              11. Bake in oven for approximately 25 - 30 minutes or until cake springs back or skewer comes out clean once inserted into the center.


              12. Allow to cool on racks and then wrap each cake in glad-wrap and refrigerate cake and frosting overnight or for a few hours.
              13. After refrigeration sandwich cakes together with a layer of frosting in between each, I also shaved some of the cake off the tops to make it flatter and more importantly for crumbling on top.

              14. Serve and enjoy!

              Frosting
              1. In an electric mixer, beat the cream cheese and mascarpone cheese until smooth.

              2. Add the vanilla and icing sugar and beat until smooth.
              3. Gradually add double cream and whip until the frosting smooth and thick.
              4. Add more cream or sugar according to taste and consistency (note: frosting will thicken slightly, overnight in fridge)